


• 1/4” OVERLAP - Anything over 1/4” may over insulate pipes. It may be necessary when wrapping around bends to exceed 1/4” and that is fine. Just be sure to stick to the 1/4” overlap for other parts of the exhaust system.
• Wrapping headers and exhaust pipes requires patience. Go slow and take your time. Make the wrap as tight as possible – this will hold the wrap on the pipe better and retain the most heat in the system.
• SOAKING IS OPTIONAL. Soaking exhaust wrap in a bucket of water is NOT necessary. You may spray the header/exhaust wrap with water . Spraying exhaust wrap with water as you work can make installation easier and also reduce the amount of fibers. Wetting does not cause the wrap to shrink, but it makes it stick to itself better.
• GET YOUR PIPES CLEANED! Remove any grease or dirt from any exhaust pipes. Failure to do so may result in fire.
1. Put on your glasses, dust mask, and gloves.
2. Clean exhaust system - clean headers, exhaust pipes, mufflers from grease and dirt. Failure to do so may result in a fire.
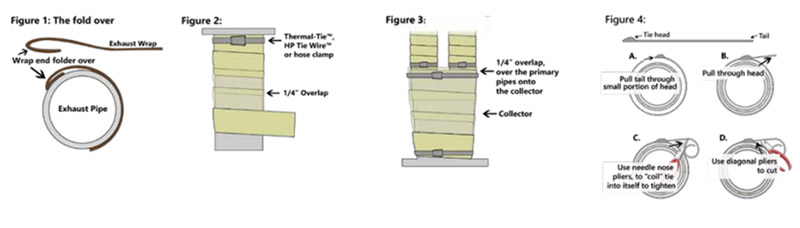
3. Start by folding back the end of the exhaust wrap by 3/4”~1”. Make sure you tuck the fold end under the exhaust wrap and place on the pipe. This reduces fraying on the end of the wrap. (Figure 1)
4. Make one full initial wrap around the pipe, flush with flange or edge of pipe. Continue wrapping around the pipe at an angle eventually working to a 1/4” overlap of the wrap. Keep tension on the wrap as you coil it around the pipes. Wrap around the pipe roughly around pipe 3 to four more times and then secure wrap at flange with Thermal-Tie™, HP Tie Wire™, or hose clamp. (Figure 2)
5. After securing end, continue to wrap around pipe, using 1/4” overlap with each pass (Figure 2), and keeping tension on the exhaust wrap.
6. Every 5 or 6 passes (or coils) around pipe, use your hands to twist the wrap more tightly onto the pipe. If you soaked the wrap, you’ll see water dripping out. Getting the water out is not the purpose for this; tightening the wrap to the exhaust pipe is.
7. If your primary tubes become so close together you cannot wrap them individually, wrap multiple pipes as one. Maintain the same 1/4” overlap. When wrapping the collector, start with a 1/4” of wrap overlapped on the wrapped primary tubes (Figure 3).
8. On the final pass around the pipe, fold over about 3/4” of the wrap, and tuck it underneath itself. Then secure the last coil of wrap with Thermal-Tie™, wire or hose-clamp (Figure 4).
PLEASE NOTE: Your exhaust wrap will smoke when it gets hot for a short period after installation. The smoke is caused by binders (starches) burning off. It is non-toxic, and it is part of the curing process. Your wrap will not burst into flames. It is temporary.


